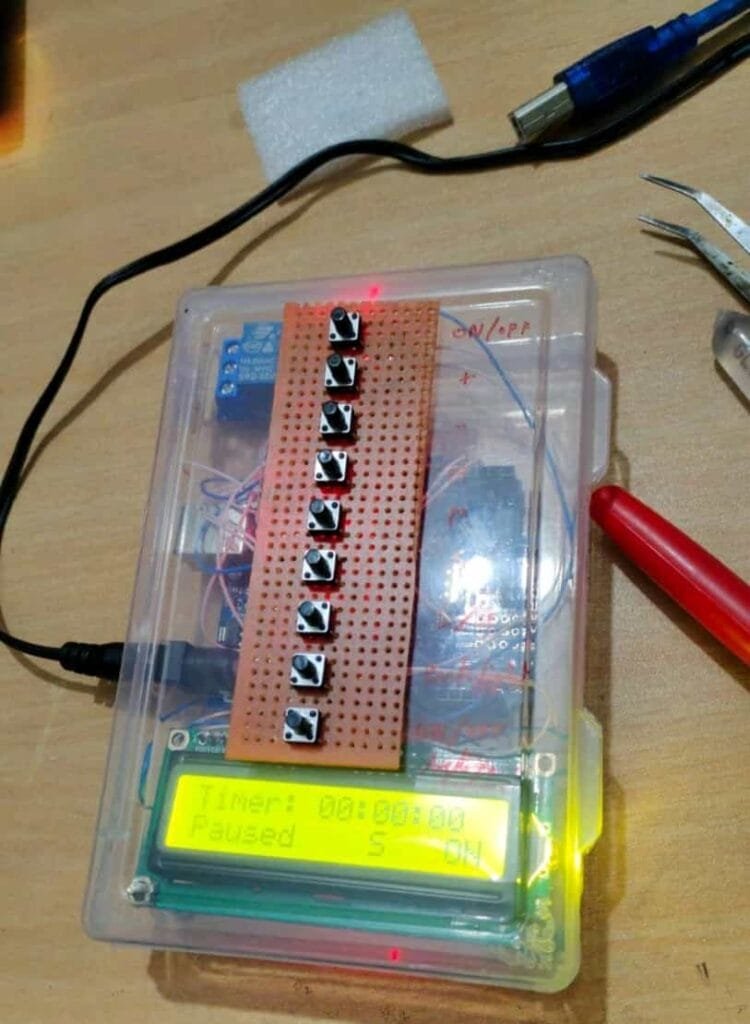
Introduction:
In this blog, we will build an On-Off Delay Timer using an Arduino Uno, a 16×2 LCD with I2C module, and tactile switches. This timer allows users to set a countdown for hours, minutes, and seconds, then automatically control a relay based on the set time.
Required Components:
| Component | Quantity |
|---|---|
| Arduino Uno | 1 |
| 16×2 LCD with I2C Module | 1 |
| 5V 1-Channel Relay Module | 1 |
| Tactile Switches | 8 |
| 10kΩ Resistors (Optional for Pull-Down) | 8 |
| Jumper Wires | As needed |
| Breadboard | 1 |
| 5V Power Supply | 1 |
Connection Table:
| Arduino Uno Pin | Component |
|---|---|
| 2 | On/Off Toggle Switch |
| 3 | Increase Button |
| 4 | Decrease Button |
| 5 | Hour Select Button |
| 6 | Minute Select Button |
| 7 | Second Select Button |
| 8 | Play/Pause Button |
| 9 | Relay Module (Signal) |
| 10 | LCD Backlight Toggle Button |
| 11 | Relay Mode Selection Button |
| A4 (SDA) | LCD SDA |
| A5 (SCL) | LCD SCL |
Code:
Copy the code below and upload it to your Arduino Uno.
#include <Wire.h>
#include <LiquidCrystal_I2C.h>

#define RELAY_PIN 9
#define ON_OFF_SWITCH 2
#define INCREASE_BUTTON 3
#define DECREASE_BUTTON 4
#define HOUR_BUTTON 5
#define MINUTE_BUTTON 6
#define SECOND_BUTTON 7
#define PLAY_PAUSE_BUTTON 8
#define LCD_BACKLIGHT_BUTTON 10
#define OPERATION_SELECT_BUTTON 11

LiquidCrystal_I2C lcd(0x27, 16, 2);

bool relayState = false;
bool timerRunning = false;
bool lcdBacklight = true;
bool relayMode = false;
int hours = 0, minutes = 0, seconds = 0;
unsigned long lastMillis = 0;
int selectedMode = 0;

void setup() {
    pinMode(RELAY_PIN, OUTPUT);
    pinMode(ON_OFF_SWITCH, INPUT_PULLUP);
    pinMode(INCREASE_BUTTON, INPUT_PULLUP);
    pinMode(DECREASE_BUTTON, INPUT_PULLUP);
    pinMode(HOUR_BUTTON, INPUT_PULLUP);
    pinMode(MINUTE_BUTTON, INPUT_PULLUP);
    pinMode(SECOND_BUTTON, INPUT_PULLUP);
    pinMode(PLAY_PAUSE_BUTTON, INPUT_PULLUP);
    pinMode(LCD_BACKLIGHT_BUTTON, INPUT_PULLUP);
    pinMode(OPERATION_SELECT_BUTTON, INPUT_PULLUP);

    lcd.init();
    lcd.backlight();
    updateDisplay();
}

void loop() {
    if (digitalRead(ON_OFF_SWITCH) == LOW) {
        relayState = !relayState;
        digitalWrite(RELAY_PIN, relayState ? HIGH : LOW);
        delay(300);
    }
    if (digitalRead(HOUR_BUTTON) == LOW) { selectedMode = 0; delay(300); }
    if (digitalRead(MINUTE_BUTTON) == LOW) { selectedMode = 1; delay(300); }
    if (digitalRead(SECOND_BUTTON) == LOW) { selectedMode = 2; delay(300); }
    if (digitalRead(INCREASE_BUTTON) == LOW) { increaseTime(); delay(300); }
    if (digitalRead(DECREASE_BUTTON) == LOW) { decreaseTime(); delay(300); }
    if (digitalRead(PLAY_PAUSE_BUTTON) == LOW) { timerRunning = !timerRunning; delay(300); }
    if (digitalRead(LCD_BACKLIGHT_BUTTON) == LOW) {
        lcdBacklight = !lcdBacklight;
        lcdBacklight ? lcd.backlight() : lcd.noBacklight();
        delay(300);
    }
    if (digitalRead(OPERATION_SELECT_BUTTON) == LOW) {
        relayMode = !relayMode;
        delay(300);
        updateDisplay();
    }

    if (timerRunning && (millis() - lastMillis >= 1000)) {
        lastMillis = millis();
        if (hours > 0 || minutes > 0 || seconds > 0) {
            if (seconds > 0) seconds--;
            else if (minutes > 0) { minutes--; seconds = 59; }
            else if (hours > 0) { hours--; minutes = 59; seconds = 59; }
            updateDisplay();
        } else {
            timerRunning = false;
            relayState = relayMode;
            digitalWrite(RELAY_PIN, relayState ? HIGH : LOW);
            updateDisplay();
        }
    }
}

void updateDisplay() {
    lcd.clear();
    lcd.setCursor(0, 0);
    lcd.print("Timer: ");
    lcd.setCursor(7, 0);
    lcd.print(hours < 10 ? "0" : ""); lcd.print(hours); lcd.print(":");
    lcd.print(minutes < 10 ? "0" : ""); lcd.print(minutes); lcd.print(":");
    lcd.print(seconds < 10 ? "0" : ""); lcd.print(seconds);
    lcd.setCursor(0, 1);
    lcd.print(timerRunning ? "Running" : "Paused");
    lcd.setCursor(10, 1);
    if (selectedMode == 0) lcd.print("H");
    else if (selectedMode == 1) lcd.print("M");
    else lcd.print("S");
    lcd.setCursor(14, 1);
    lcd.print(relayMode ? "ON" : "OFF");
}

void increaseTime() {
    if (selectedMode == 0 && hours < 23) hours++;
    else if (selectedMode == 1 && minutes < 59) minutes++;
    else if (selectedMode == 2 && seconds < 59) seconds++;
    updateDisplay();
}

void decreaseTime() {
    if (selectedMode == 0 && hours > 0) hours--;
    else if (selectedMode == 1 && minutes > 0) minutes--;
    else if (selectedMode == 2 && seconds > 0) seconds--;
    updateDisplay();
}
How It Works:
- Set the Time: Select hours, minutes, or seconds using the dedicated buttons.
- Start/Pause the Timer: Press the play/pause button.
- Toggle LCD Backlight: Use the LCD backlight button to turn the display light on/off.
- Set Relay Behavior: Choose whether the relay turns ON or OFF when the timer ends.
- Control Relay Manually: Use the On/Off switch to manually control the relay.
This simple project is great for beginners who want to learn about timers, LCD displays, and relay control with Arduino. 🚀 Happy Coding!
