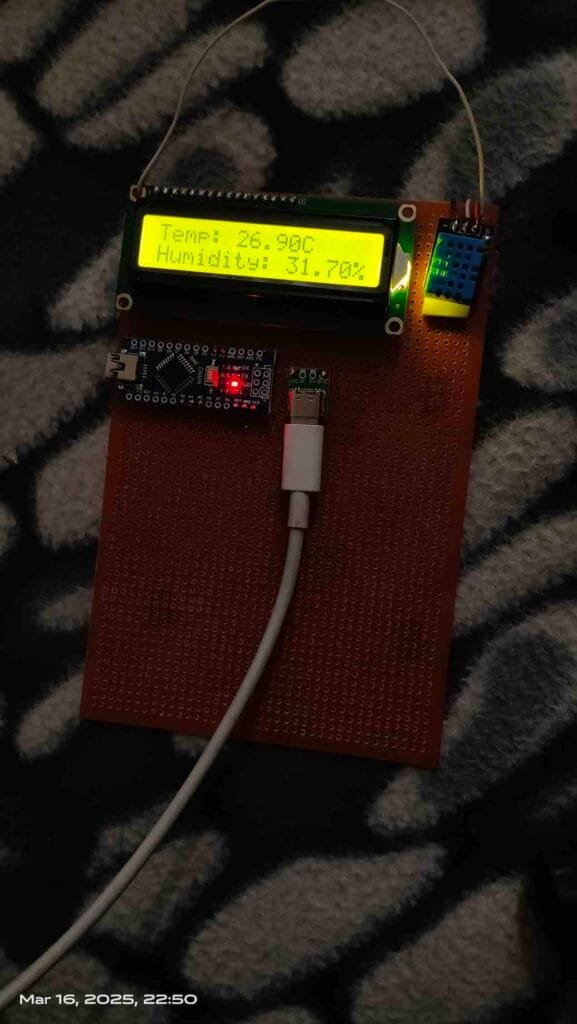
In this project, we’ll learn how to display the temperature and humidity readings from a DHT11 sensor on an LCD screen. The DHT11 sensor is a basic digital temperature and humidity sensor, perfect for projects where you need to monitor environmental conditions. In our setup, we’ll be using a 16×2 I2C LCD display to show the data in real-time.
What You’ll Need:
- Arduino board (e.g., Arduino Uno, Nano)
- DHT11 sensor
- 16×2 LCD with I2C interface
- Jumper wires
Wiring Overview:
- DHT11 Sensor:
- Connect the VCC pin of the DHT11 to 5V on the Arduino.
- Connect the GND pin to the GND pin on the Arduino.
- The DATA pin should be connected to digital pin 2 on the Arduino (this can be changed in the code).
- I2C LCD:
- The VCC pin connects to 5V.
- The GND pin connects to GND.
- The SDA and SCL pins should connect to the Arduino’s A4 (SDA) and A5 (SCL) pins, respectively (for an Arduino Uno).
Install the DHT Sensor Library
- Open Arduino IDE.
- Go to Sketch → Include Library → Manage Libraries.
- In the Library Manager, search for DHT sensor library.
- Install the one by Adafruit (Adafruit DHT sensor library).
- Also, install Adafruit Unified Sensor library (required for DHT).
- Restart the Arduino IDE.
- Try compiling again.
After installing, your code should compile without errors. Let me know if you face any issues! 🚀
The Code Breakdown:
Let’s walk through the code step by step:
#include <Wire.h>                    // For I2C communication
#include <LiquidCrystal_I2C.h>        // LCD library for I2C displays
#include <DHT.h>                      // DHT sensor library

#define DHTPIN 2                     // Pin for data from DHT11
#define DHTTYPE DHT11                 // We are using the DHT11 sensor
DHT dht(DHTPIN, DHTTYPE);            // Create DHT object

LiquidCrystal_I2C lcd(0x27, 16, 2);  // Initialize LCD (I2C address 0x27, 16x2 display)
- The code begins by including necessary libraries:
Wirefor I2C communication,LiquidCrystal_I2Cfor the LCD, andDHT.hfor the DHT11 sensor. - We define the DHTPIN (data pin) and the type of DHT sensor being used (
DHT11in this case). We then create an objectdhtto interface with the sensor. - The
lcdobject is initialized with the I2C address0x27(default for many I2C LCDs) and the dimensions of the display (16 columns by 2 rows).
Setup Function:
void setup() {
    dht.begin();                     // Initialize the DHT sensor
    lcd.init();                       // Initialize the LCD screen
    lcd.backlight();                  // Ensure the backlight is always on
    lcd.clear();                      // Clear the display initially
}
- In the
setup()function, the DHT sensor and LCD are initialized. The backlight of the LCD is turned on, and the display is cleared to ensure a clean start.
Main Loop:
void loop() {
    float temp = dht.readTemperature(); // Read temperature in Celsius
    float hum = dht.readHumidity();     // Read humidity percentage

    // Check if readings are valid
    if (isnan(temp) || isnan(hum)) {
        lcd.setCursor(0, 0);            // Move cursor to top-left of screen
        lcd.print("Sensor Error!");     // Display error message
        delay(1000);                     // Wait for 1 second before retrying
        return;                          // Skip this cycle if sensor fails
    }

    // Display Data on LCD
    lcd.clear();                        // Clear previous readings
    lcd.setCursor(0, 0);                // Set cursor to top-left
    lcd.print("Temp: ");                // Display temperature label
    lcd.print(temp);                    // Display temperature value
    lcd.print("C");                     // Display "C" for Celsius

    lcd.setCursor(0, 1);                // Set cursor to second row
    lcd.print("Humidity: ");            // Display humidity label
    lcd.print(hum);                     // Display humidity value
    lcd.print("%");                     // Display "%" sign

    // Wait for 1 second before updating the display
    delay(1000);
}
- In the
loop()function, the temperature and humidity are read from the DHT11 sensor. If the readings are invalid (which can happen if the sensor is disconnected or malfunctioning), an error message is displayed on the LCD, and the program waits for 1 second before retrying. - If the readings are valid, the LCD is cleared, and the temperature and humidity values are displayed. The data is updated every second, thanks to the
delay(1000)at the end.
Key Points:
- Sensor Validation: The
isnan()function checks if the readings are valid. If any reading is invalid, the display shows “Sensor Error!”. - LCD Updating: The LCD screen is cleared and updated every second, ensuring that fresh data is displayed.
Full Code:
#include <Wire.h>
#include <LiquidCrystal_I2C.h>
#include <DHT.h>

// Define DHT11 Sensor
#define DHTPIN 2       // Data pin connected to digital pin 2
#define DHTTYPE DHT11
DHT dht(DHTPIN, DHTTYPE);

// Initialize LCD with I2C Address 0x27 (16 columns x 2 rows)
LiquidCrystal_I2C lcd(0x27, 16, 2);

void setup() {
    dht.begin();         // Initialize DHT11 sensor
    lcd.init();          // Initialize LCD
    lcd.backlight();     // Turn on LCD backlight
    lcd.clear();         // Clear the display
}

void loop() {
    // Read Temperature and Humidity
    float temp = dht.readTemperature();  // Temperature in Celsius
    float hum = dht.readHumidity();     // Humidity in percentage

    // Check for valid readings
    if (isnan(temp) || isnan(hum)) {
        lcd.setCursor(0, 0);
        lcd.print("Sensor Error!");    // Display error if reading fails
        delay(1000);
        return;                      // Skip to next loop iteration
    }

    // Display temperature and humidity on LCD
    lcd.clear();
    lcd.setCursor(0, 0);
    lcd.print("Temp: ");
    lcd.print(temp);
    lcd.print("C");

    lcd.setCursor(0, 1);
    lcd.print("Humidity: ");
    lcd.print(hum);
    lcd.print("%");

    delay(1000);  // Update every 1 second
}
Connections:
DHT11 Sensor:
- VCC → 5V on Arduino
- GND → GND on Arduino
- DATA → Digital Pin 2 on Arduino
16×2 I2C LCD:
- VCC → 5V on Arduino
- GND → GND on Arduino
- SDA → A4 on Arduino (for Uno/Nano)
- SCL → A5 on Arduino (for Uno/Nano)
Upload the code to your Arduino board, and the LCD will display real-time temperature and humidity readings from the DHT11 sensor. If the sensor fails to provide data, an error message will appear.

